Navigation: Cart Settings > Appearance Settings Overview >
Edit Site Layout


|
Navigation: Cart Settings > Appearance Settings Overview > Edit Site Layout |
|
In this section you can edit site width, change top navigation bar settings, change placement of boxes on the pages and add custom boxes.
To edit site layout, follow the steps:
1. Open the Appearance Settings page.
2. Click Edit Site Layout in the Appearance Settings page.
Site Layout page opens.
3. Site Width & Align: Select the site width & align by clicking on the respective radio button, as shown in the Figure 6-39-1 below.
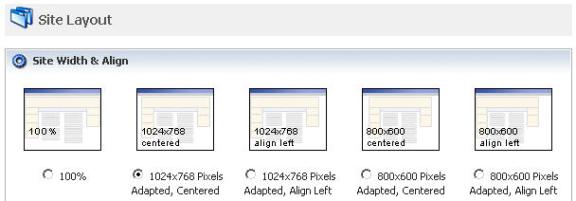
Figure 6-39-1: Site Width & Align
4. Top Bar Settings: Decide the height of the Top Bar and will it be visible. Enter the following information, as shown in the Figure 6-39-2 below:
a. Is Top Bar Visible: Select Yes from the drop down menu to make the Top Bar visible.
b. Top Bar Height (pixels): Enter the Top Bar Height in pixels.
c. Checkout Controls Location: Select the checkout controls location (i.e. Top Bar or Over Top Bar) from the drop-down menu.
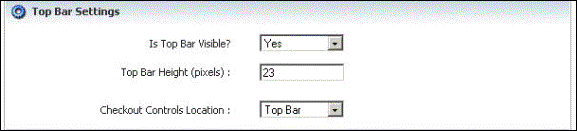
Figure 6-39-2: Top Bar Settings
5. Box Settings: Here you can customize the settings of the boxes. Enter the following information, as shown in the Figure 6-39-3 below:
a. Hide boxes on checkout pages: Select Yes from the drop down menu to hide boxes on checkout pages, otherwise select No.
b. Hide right side on fixed-width carts: Select Yes from the drop down menu to auto-hide right side boxes on the Catalog, Cart & Project information pages, otherwise select No.
c. Boxes width (pixels): Enter the box width in pixels.
d. Boxes Header Text Allign: Select the box header text alignment (Center, Left or Right) from the drop-down menu.
e. Category Menu: Select Right or Left from the drop down menu, wherever you want Category Menu box to be displayed and also select the Priority from the drop down menu. You can select this on a scale of 1 to 10, where 1 is given the highest priority.
f. My Cart: Select Right or Left from the drop down menu, wherever you want My Cart box to be displayed and also select the Priority from the drop down menu. You can select this on a scale of 1 to 10, where 1 is given the highest priority.
g. Best Sellers: Select Right or Left from the drop down menu, wherever you want Best Sellers box to be displayed and also select the Priority from the drop down menu. You can select this on a scale of 1 to 10, where 1 is given the highest priority.
h. Search: Select Right or Left from the drop down menu, wherever you want Search box to be displayed and also select the Priority from the drop down menu. You can select this on a scale of 1 to 10, where 1 is given the highest priority.
i. Subscribe: Select Right or Left from the drop down menu, wherever you want Subscribe box to be displayed and also select the Priority from the drop down menu. You can select this on a scale of 1 to 10, where 1 is given the highest priority.
j. Recent Items: Select Right or Left from the drop down menu, wherever you want Recent Items box to be displayed and also select the Priority from the drop down menu. You can select this on a scale of 1 to 10, where 1 is given the highest priority.
k. Manufacturers: Select Right or Left from the drop down menu, wherever you want Manufacturers box to be displayed and also select the Priority from the drop down menu. You can select this on a scale of 1 to 10, where 1 is given the highest priority.
Note: Please click here to edit boxes headers link below Box Settings in Site Layout page to open Edit Site Headers page. To know more about edit site headers, click here.
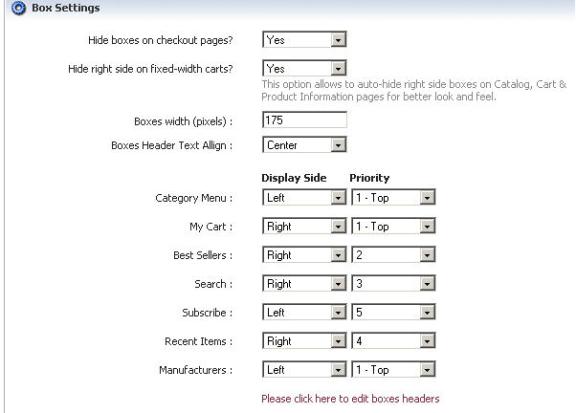
Figure 6-39-3: Box Settings
Custom Boxes Settings: Here you can Add, Edit or Delete Custom boxes.
6. To Add A New Box. Click Add a New Box link in Custom Boxes Settings, as shown in the Figure 6-39-4 below.
![]()
Figure 6-39-4: Custom Boxes Settings
The Site Box (insert) page will open. Here, you can add a custom box to Your cart.
Note: Click on Click here to edit Appearance Settings (Default Images, Layout and Colors) link to open Appearance Settings page.
7. Common Box Properties: Enter the following information, as shown in the Figure 6-39-5 below:
a. Box Name: Enter the box name to easily identify a box in admin area.
b. Header Text or HTML: Enter the header text.
c. Box Side/Visibility: Select Right or Left from the drop down menu, wherever you want the box side visible. You can also select Invisible to hide it.
d. Priority: Priority is used for sorting. You can select this on a scale of 1 to 10 from the drop down menu, where 1 is given the highest priority.
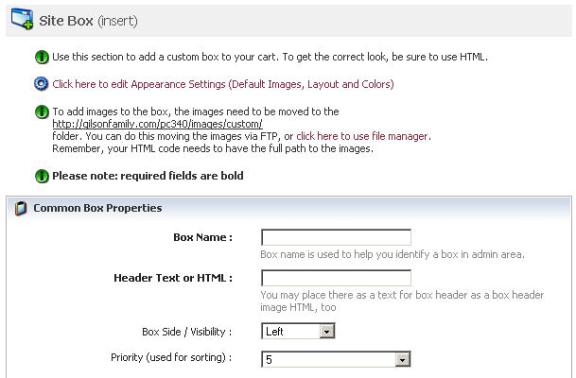
Figure 6-39-5: Common Box Properties
8. Box HTML: Enter text in the Box HTML box.
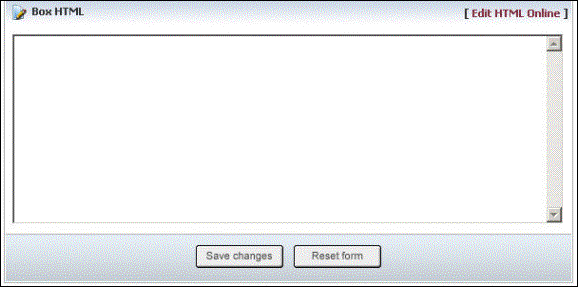
Figure 6-39-6: Box HTML
9. You can also create an eye-catching description by clicking Edit HTML Online in Box HTML.
10. If you want to cancel or start again, click on the Reset form button.
11. Click Save changes button to save details about adding a box.
12. To Edit a Box, click on Edit ![]() icon under Custom Boxes Settings in Site Layout page. The Site Box (update) page opens, where you can edit all the parameters. After editing, click Save changes button to update.
icon under Custom Boxes Settings in Site Layout page. The Site Box (update) page opens, where you can edit all the parameters. After editing, click Save changes button to update.
13. To Delete a Box, click on Delete ![]() icon under Custom Boxes Settings in Site Layout page. A confirmation pop up appears, click OK button to delete the box.
icon under Custom Boxes Settings in Site Layout page. A confirmation pop up appears, click OK button to delete the box.
14. If you want to cancel or start again, click on Reset form button.
15. Click Save changes button to update the site layout settings.