Froogle is a new service from Google that find information about products for sale online. By concentrating completely on product search, Froogle applies the power of Google's search technology to a very particular task: locating stores that sell the item you want to find and pointing you directly to the place where you can make a purchase.
1. Click Froogle Data Feed, as shown in the figure 8-1-1 below.
2. Froogle Data Feed Export page will open, as shown in the figure 8-1-2 below.
Note: You can also open the Froogle Data Feed Export page directly by clicking on Froogle Data Feed link in the Admin Area Home page.
3. Product Description: Select Use quick overview or Use detailed description from the drop down menu.

4. Click Export data feed button. You will be taken to the Your Cart login page.
Altura Data Feed will allow you to add products to their site and increase your exposure.
1. Click Altura Data Feed, as shown in the figure 8-2-1 below.
2. Altura Data Feed page will open, as shown in the figure 8-2-2 below.
Note: You can also open the Altura Data Feed page directly by clicking on Altura Data Feed link in the Admin Area Home page.
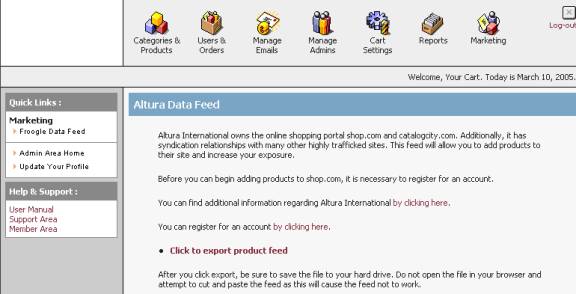
3. Before you can add a product to their site, you need to register for an account. You can easily register for an account, by clicking on the register for an account link in the Altura Data Feed page.
4. After registering, click to export product feed and save the file in your hard drive.
You can use this section to globally set or remove sale prices within the cart.
To set sale prices within the cart, follow the steps:
1. Click Sale Prices, as shown in the figure 8-3-1 below.

Setup Sale Prices page will open, as shown in the figure 8-3-2.
2. Under Price Update Settings, click on the radio button of the Set New Sale Prices and enter the discount price. You can also select from the drop down menu that the discount is in % or $.
Note: You can also delete all sale prices by clicking on the radio button of the Remove All Sale Prices and then clicking Save Changes button to remove all the sale prices. A confirmation pop up appears, click OK.
3. Click Save changes button to save the details. You will get a confirmation message that the Sale Prices has been updated successfully.
This section will allow you to integrate or put together the iDevAffiliate application.
To integrate the iDevAffiliate application, follow the steps:
1. Click iDevAffiliate App Integration, as shown in the figure 8-4-1 below.

iDev Affiliate Integration page will open, as shown in the figure 8-4-2.
2. Affiliate App Integration Settings: Enter the following information, as shown in the figure 8-4-2 below:
a. Do You Want to Enable iDevAffiliate: Select Yes from the drop down menu if you want to enable iDevAffiliate, otherwise select No.
b. iDevAffiliate Installation URL: Enter the iDevAffiliate Installation URL.
c. iDev Affiliate Username: Enter the iDevAffiliate username.
d. iDev Affiliate Password: Enter the iDevAffiliate password.
e. Affiliate Link Text: Enter the Affiliate Link Text.
3. Click Save changes button to save details about the iDevAffiliate Integration Settings.
A confirmation pop up appears, as shown in the figure 8-4-3 below, which will tell that the Affiliate Settings have been saved successfully.
4. Click OK.